
MSI Maestro 900R PC case review
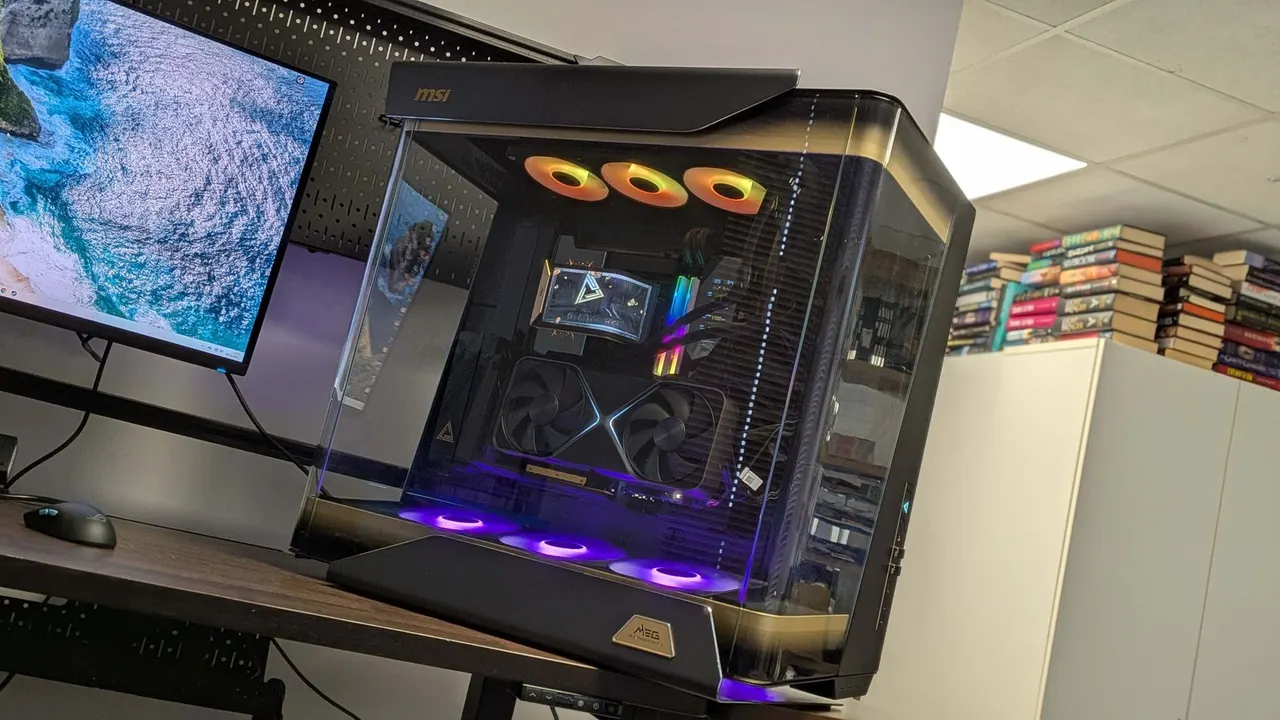
It's just me in the office today. Normally that's fine. I don't mind the quiet, and I can be as messy as I like without Jacob tutting at me. Today is different. Today that comes with a healthy dose of fear. Fear because I have to lift the MSI Maestro 900R case up onto the test bench desk, and I don't think Paul, the oddball security guard way downstairs at the front desk, will hear me if I scream because my spine…
Our Verdict
You will get a super-clean final build out of the Maestro 900R, and it will look stunning for the most part. But when you get up close, there are some parts which don't feel totally premium, and the price is as much of a barrier as the tempered glass side panels are to actually getting to your system's I/O ports.
For
- Wraparound glass looks great
- Finished internal build looks super clean
- Pull-out test bench is neat
Against
- Price is prohibitive
- Doesn't feel totally premium
- Lack of access will frustrate some (me)
PC Gamer's got your back
Our experienced team dedicates many hours to every review, to really get to the heart of what matters most to you. Find out more about how we evaluate games and hardware.
It's just me in the office today. Normally that's fine. I don't mind the quiet, and I can be as messy as I like without Jacob tutting at me. Today is different. Today that comes with a healthy dose of fear. Fear because I have to lift the MSI Maestro 900R case up onto the test bench desk, and I don't think Paul, the oddball security guard way downstairs at the front desk, will hear me if I scream because my spine has snapped. It's a two person job and I'm very much a one-person team in PC Gamer towers today. I have managed to get it situated on the desk, but I can certainly feel it in my near fifty-year-old back muscles. *Spasm*. And when you need another human on hand every time you want to shift your gaming PC about, I think that says a lot about both this MSI case and who it's aimed at.
In short, I think you need to be someone who has their own staff.
That's partly a dig at its sheer scale—this thing is chomk with a capital CHOMK—but also at the fact only the very wealthy are going to consider this chassis a worthwhile casing for their gaming PC. This is a $700 (£800) PC case and that feels, on one hand, par for the course in these days of hyper-expensive everything, but also faintly anachronistic.
As always with the case reviewing process, I built a new PC inside it, and it only felt right to be doing so with high-end gear. So, I picked from the review kit that was in the cupboard: a MSI Godlike X with a Ryzen 9 9950X3D seemed appropriate, along with some 64 GB of G.Skill ULL memory and an RTX 5090. And that's when this whole endeavour started to feel like something from a bygone age.
Before, when I'd do a high-end build, it felt exciting in a way that was both special—because I could never spend out on such premium parts myself—but also still kind of achievable, too, because the money wasn't so far beyond the realms of decency that you couldn't imagine someone normal pushing their budget a little far to get this sort of kit. But looking at the parts going into this, it's around $12,000 worth of kit at least. And that feels well beyond a normal PC gamer and into faintly distasteful territory.
But, in all honesty, I'm not even totally convinced the MSI Maestro 900R really deserves its place in such company. Sure, it's elegant in black and gold trim, but there are odd touches here and there which belie the super premium pricing. The most egregious is something I picked out when I saw a preview case out at Computex this year, and that's the top flair on the case. The metal 'lid' only covers half of the dust filter for the 360 mm cooler I'd mounted to the top, and that filter is just a flimsy plastic one I wouldn't really want on display.
I also question the utility of having the motherboard and GPU's outputs all out of reach in the centre of the case, behind tempered glass shields. There are a ton of Type-A and Type-C USB ports on the front panel, but still it's a lot of effort to get to the I/O panel of your motherboard. And don't get me started on the PSU buried right in the back of the case, with impossible-to-reach switches and plug sockets.
Keep up to date with the most important stories and the best deals, as picked by the PC Gamer team.
But there are things I like, too. The wraparound glass does look great, and I loved having so much space to work in when building into the rig. And to have that full central motherboard tray be completely removable was a treat, as well. You essentially have your own little test rig there, so you can make sure everything works before you do the full install. It's neat. As is the final build.
But honestly, this feels more like a chassis you might buy for someone else to build into. Because you're Mr. or Mrs. Moneybags and don't want to get your hands dirty doing manual labour and just want to have a high-end rig to play your games on in something that stands like a glass and gold monolith in the bespoke gaming room of your palace.
✅ You only have a passing knowledge of what's in your bank account: If you watch the pennies this isn't a chassis for you, but if you don't—and you're into the black, glass, and gold aesthetic, and have the space—then maybe it's worth considering.
❌ You need regular access to your mobo's I/O panel: The Maestro 900R hides it all away inside the case, meaning you have to open it up to get at the back of your motherboard.
You will get a super-clean final build out of the Maestro 900R, and it will look stunning for the most part. But when you get up close there are some parts which don't feel totally premium, and the price is as much of a barrier as the tempered glass side panels are to actually getting to your system's I/O ports.
Features
The key things to note are the sheer size of this beast. At well over 30 kilos, this is a massive chassis and when you've built a rig into it, that weight only goes up. It's a two-person job shifting this thing around, as my poor back can attest to.
The other thing is that it is really pleasing to build into. Thanks, in part, to the size of the case and the space you have to work in, but also because of that central motherboard tray. It is effectively a standalone test bench, and makes putting the board itself in place a doddle. It's also rotatable, so you can orient your system inside however you'd like. And because all the external cables need to be routed around from inside to outside anyways, you don't have to worry about where the mobo's I/O is going to go because it'll largely be inaccessible anyways.
To help this you have four 10 Gbps Type-C USB ports on the front of the case, along with a further 20 Gbps Type-C with 60 W power delivery, and four 5 Gbps USB Type-A ports. That does salve some of the pain of not being able to access your motherboard's back panel.
The other useful thing is that it comes with three 160 mm reverse blade fans, so the intakes on the base don't show their ugly side and ruin the high-end aesthetic.
Installation
Installation is an absolute joy… until it isn't. That occurs towards the end of the build, but at the start it really is all fun and games. The removable fan tray makes it easy to get your 360 mm radiator in place and the scale of the case means there's always space to work in when you've pulled the tool-free side panels off.
That motherboard tray is excellent, too. I was a big fan of that when I saw it out at Computex, and have been just as impressed now I've used it properly. The issue is that if you want to test out the components you've bought for this build using it as a standalone test bench, you will have to largely break it all down again before you can jam it into the system itself. But that's to be expected, and being able to just get your motherboard, CPU, cooling bracket, SSD, and RAM in place free from even the modest constraints of this massive rig is a real boon.
The installation pain is rear-loaded, however, and once you've got everything inside and wired up internally it then becomes a game of figuring out how the hell you're actually going to attach this thing up to either power or a monitor. There is no real back to this case, with the wraparound tempered glass surrounding the entire plane you mount the motherboard too. That means all the cables, from power, to display, to networking and anything else going into the back of your board, need to be routed out of some grommeted holes on the underside of the case.
It means you'll likely need a longer HDMI or DP cable than you have right now, because it needs to be routed in and around the inside of the case to get to the vertically mounted graphics card, which cuts a lot off its length. And you're unlikely to be sitting this on a desktop given its girth, so it's going to need to stretch from the ground up. Similarly, the power cable for the PSU has to be squeezed into the case, and if you're using a large PSU—such as the MSI MEG Ai1600T brick I've been using—then that doesn't give you a lot of space to attach its fat plug.
Aesthetics
But that lack of a busy, cable-heavy backside to the case does really aid the aesthetic. The shroud (which is sadly quite flimsy plastic) that covers the rear of the vertically mounted GPU and the rear of the motherboard hides all the cables that sprout from their outputs as they're fed out the underside of the case, and that gives it a really clean finish. Inside, it looks like there is almost nothing connecting the components, leaving them looking like they're floating around inside. The MSI Godlike X motherboard only helped this by hiding a lot of its power cabling, too.
The angled reverse-bladed fans on the bottom intake are slightly angled, which allows you to see them in all their RGB LED glory, but that, coupled with the angling of the top radiator mount, makes it feel even bigger inside. I really like the full wraparound tempered glass, too. It really gives it a showpiece aesthetic, which I can see being used at a bunch of PC trade show booths in the future.
What slightly ruins that aesthetic, however, is the exposed plastic dust cover on the top of the case. The metal cover, which slots on without screws, only partially covers the things, leaving it open to be eyeballed. And it's not a great look. Likewise, the plastic shroud covering the cables inside looks and feels flimsy. It's the same with the power and LED buttons on the front panel. They look like they could have come from any $50 chassis, as does the lightbar on the rear side of the case's top.
Value
It is not the most expensive PC chassis you can buy on Newegg right now. But that's mostly because Newegg's marketplace is an odd place to be and there are a ton of Hatsune Miku Asus cases on there with four-figure price tags, and I can't figure out why. There's also a $1,000 Asus ProArt chassis on there, but you can also just buy that for $300 direct from Newegg if you'd rather. Which is a roundabout way of me saying that it is pretty much the most expensive chassis you can buy on Newegg without delving into the murky realms of the marketplace.
And, personally, I find it hard to reconcile any notions of value against the MSI Maestro 900R beyond the sheer mass of the thing. Were we going by size and weight, then, I guess it's a match for the Asus ProArt PA602. That's half the weight and half the price, so on a purely per-gram metric, it's all evens Antoine Griezmanns.
But in real terms, it's a massive, expensive case, that I struggle to find genuine ways to justify its cost. There are some neat features, such as that mobo tray, but also some genuine points of frustration that would have me not actually wanting to clothe my PC parts in its black, gold, and glass surrounds. I'm happy with my—what seems to be rather diminutive now—Hyte Y70 Touch. Again, it's half the price, but at least I can get at my PC bits and not break my spine picking it up off the ground.
1. Best overall: Corsair Air 5400
2. Best budget: Corsair 3200D
3. Best midrange: Thermaltake View 380
4. Best budget compact: Thermaltake S100 TG Snow Edition
5. Best Mini-ITX: Fractal Design Terra
6. Best Micro-ATX: NZXT H3 Flow
7. Best full-tower: NZXT H7 Flow
8. Best for airflow: Havn BF 360
You will get a super-clean final build out of the Maestro 900R, and it will look stunning for the most part. But when you get up close, there are some parts which don't feel totally premium, and the price is as much of a barrier as the tempered glass side panels are to actually getting to your system's I/O ports.
Dave has been gaming since the days of Zaxxon and Lady Bug on the Colecovision, and code books for the Commodore Vic 20 (Death Race 2000!). He built his first gaming PC at the tender age of 16, and finally finished bug-fixing the Cyrix-based system around a year later. When he dropped it out of the window. He first started writing for Official PlayStation Magazine and Xbox World many decades ago, then moved onto PC Format full-time, then PC Gamer, TechRadar, and T3 among others. Now he's back, writing about the nightmarish graphics card market, CPUs with more cores than sense, gaming laptops hotter than the sun, and SSDs more capacious than a Cybertruck.
You must confirm your public display name before commenting
Please logout and then login again, you will then be prompted to enter your display name.